

Retro Kitchen
- Aug 13, 2021
- 5 min read
I LOVE thrift shopping! Which is a darn good thing since my business relies greatly on my thrifting finds! This retro kitchen is one of those finds that I tried to walk away from..... and just couldn't! I actually made it out to my car.... and had to go back into Goodwill and get it! I didn't need it. I didn't have a client that needed it. I just knew my heart wanted it and that was enough for me!

I think it reminds me of my childhood. The little kitchens we had in school...... I know it's old..... I'm old! LOL!

I fully intended to make it a kitchen for a princess...... with pale pink and a frosty gold shimmer with lots of moulds and scrolls and sparkle! I spent several hours prepping it for my live Wednesday night broadcast.... pulling product and planning my design. When just minutes before going live..... a facebook friend asked if I was going for the retro diner look.... with red and white checks and touches of turquoise? OH MY WORD YES!!!! For the first time ever..... I changed my design plan with only seconds to spare before the Wednesday show. I located a few inspiration pics via Google.... and chose this as my favorite! So this is how the transformation went down.

I gave it a good cleaning with White Lightning..... it was filthy!

Matt helped me remove all the doors, drawers, hardware and hinges during the broadcast. I treated the top laminate surface with Slick Stick... just in case I chose to paint it. I hadn't really decided at that point. I then painted the body in two coats of Dixie Belle Blue.

Based on a poll I took during the Live... it was decided that the inside of the cabinet and drawers needed to be painted as well.... and I chose Honky Tonk Red. I love the contrast of the red and the turquoise... they play off of each other so well! This took two coats using the super fun Scarlett brush. It's great for tight spaces and covers a lot of space with its wide bristle head.

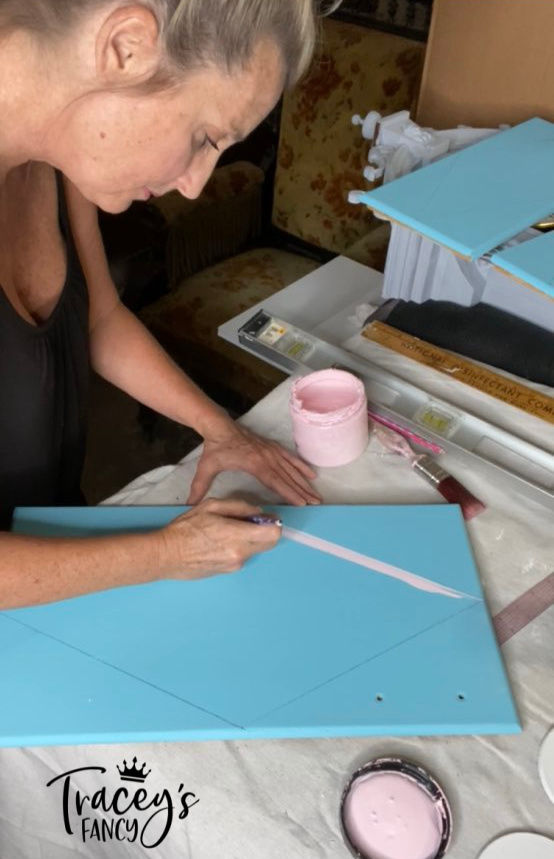
I knew I wanted to create a faux black and white backsplash so I painted the lower back section in Fluff. I wanted to bring in some baby pink on the top because I knew I'd be adding large pink harlequins to the door fronts. So I painted the back of the upper cabinets in Soft Pink using my synthetic Mini Angled brush which is perfect for cutting in hard to reach areas. I then created a cardboard pattern to use to measure off the "tiles". Once drawn..... I taped off the squares and painted every other one in Caviar with a 1" craft brush. This took two coats.

I used 1/2 of the same pattern to measure and draw stripes in the upper cabinets. I then freehand painted Honky Tonk Red in every other stripe. The space was just too tight to bother with taping off.

I primed the four burner disc and all the knobs in B.O.S.S. white.... to color block the original black.... but also felt that these would get a lot of wear and tear and a little primer wouldn't hurt! I then painted them in Fluff. Once dry, I used a ruler to draw the checkerboard pattern on the burners. I then freehanded the checkerboard pattern on the knobs. I painted every other square on the burners with Caviar. The tiny squares on the knobs were painted with an oil based paint marker for speed and ease.

I measured and drew a sunburst pattern on the stove door. I love this pattern so much and felt this was the perfect spot for it! The little drawer under the stove I decided to bring the pink and red stripes from the upper cabinets down to this area as well.

At this point I had decided to use silver leaf sheets to cover the formica..... and seal with a clear epoxy resin for a really solid surface that would be able to handle wear and tear and water from the play sink for years to come! So I used a leafing adhesive and brushed on with a chip brush. This needs to set up for at least 30 minutes until the creamy adhesive becomes clear and tacky.

Now for the door fronts. I measured off a large harlequin on all three doors.
I used two techniques..... one door I freehand painted the pattern.... and the other two I taped and painted.
I like to challenge myself but I will admit the taped doors were much faster and much easier. I used the same Soft Pink on the harlequin shapes as I did with the stripes.
Once the doors and designs were dry.... I flipped the doors over and primed with Gray B.O.S.S..... and painted with a single coat of Honky Tonk Red. I almost always use Gray B.O.S.S. under red! Reds usually require two coats and can still be streaky.... but with a coat of Gray Boss you get a nice solid coverage in one coat.
My foil leaf adhesive was clear and tacky and ready to go! I applied square sheets by hand using a gentle touch and a chip brush. I love love love leafing!!! I really should do more of it! Once all area was covered.... including taking it over the lip.... I brushed away all excess leaf and vacuumed my entire shop! LOL! It's messy! I will give this a clear epoxy resin coat.... but that will be done in a separate blog.


I used a silver spray paint to paint all handles and hinges...... playing off the chrome look I have going on with the leafing.

I decided to paint the little wooden faucet and handles with the Dixie Belle Blue. The hardware, knobs, burner disc and faucet were re-attached. The entire piece will be sprayed with Gator Hide for a durable finish.

Drum Roll Please.... The Retro Kitchen!
I am beyond thrilled with the final look..... and ever so thankful for my Facebook family that throws ideas out to me at the last minute! LOL! This kitchen was meant to look like this..... and had lived its whole "kid-kitchen" life in the raw just waiting for its debut!

I'm really glad I followed my heart that day at Goodwill! This project was FUN!
Ingredients:
For your convenience, the products listed here are what I used for the Retro Kitchen! Dixie Belle Paint Company offers amazing products that will make all of your projects successful no matter what your skill level! Just click on any of the product pictures if you need the item! You can also find my favorite products and tools in my Amazon influencer list HERE.
Here's how it works...these products are attached to my name. When you purchase by clicking from my blog.....then Dixie Belle offers a kickback to me for referring you! It doesn't cost you any more to use my links....and the support helps me to bring you new projects! So I thank you in advance!!!
If you click on the icon that looks like lines with a sideways triangle in the upper right hand corner..... it will show you the video list for this project. There are usually more than just this one video. ENJOY!
https://youtube.com/playlist?list=PLdbUPLp4izRlzGcJV0iGL9Qgj-La5dWP1
I'd love for you to follow me on Instagram, Facebook, Pinterest or YouTube to see all my creations first!! And as always, sign up to get my blog newsletter HERE to see more of my fancy furniture creations, unique art designs, room makeovers and insight into my design process!

Comments