

Painted Fabric Chair: Carnival Queen Decoupage
- Jul 27, 2025
- 5 min read
It was just time..... time for another painted fabric chair!

If you are a new reader, hello and welcome to the Fancy Fam! With over a decade of furniture painting experience, I can honestly say that sharing my projects through this blog is still my favorite way to inspire! I've got years worth of fun and creative ways to update your home decor and furniture through paint! If this sounds like something you'd like to have delivered to you every Sunday be sure to sign up for my weekly newsletter here!
Before: Fabric Chair with Button Tufts
I've had this beauty in my shop for over a year! You've likely seen it as a prop in many of my staged photos for other blogs.

It's a beautiful chair but I am really not a fan of painting tufted back chairs. I've tried it a few times and just wasn't happy with the outcome.
However.....when I received this decoupage paper from my friend Michelle.....I knew it was meant for this specific chair!
And I learned....you can paint button tufts successfully!
Supplies Used
You can also shop my favorite products and tools in my Amazon influencer list here.

This post may contain affiliate links. I could make a commission at no charge to you if you purchase my recommended products. Please read my disclosure here and my privacy policy here.
Painted Fabric Chair: Step-by-Step Guide
I painted this chair in my membership group, Curiously Creative, so I didn't take very many progress photos.
I'm going to list the steps for this project as many of you ask for the step-by-step breakdown in painting fabric... and this one is just a one color simple process! Or check out my 2-hour self-paced video tutorial for even more in-depth instruction.

Step #1: Clean and Prime the Chair
Vacuum your fabric chair.
Clean the wood frame with White Lightning and wipe back with water.
Prime fabric on back portion of the chair to block colors, stains or odors.
PRO TIP: If the fabric on the back is in good shape and the fabric is light in color or color pattern, you may paint directly on the fabric without priming.... like I did on this chair.
The goal is to apply as little products as possible to keep the fabric from feeling too stiff.
Prime the seat cushion. I almost always prime the cushion, as it helps to seal up the fabric fibers and less water and paint seep into the padding of the seat. I used Boss in Gray as my primer for this chair.

Once primer is dry, sand lightly with a sanding pad.
Step #2: Paint the Fabric
Apply paint onto fabric over the primer while lightly misting with water to keep the paint moving well and from being too thick.
Remember, the less product the better!

You may only need one coat of paint. This varies depending on the fabric as well as the color of paint you are using. Again.... less is better. I can not stress this enough!
Once dry, lightly sand with sanding pad and decide if you need a second coat. If so....just paint/mist and do a final sand after it dries again.
The painted fabric should feel silky smooth... not rough and chalky. Wipe away any dust.
For the button tufts, I used a smaller brush to apply paint to this area....making sure to mist with water and really work the thinned paint into the fold of the tuft.

Once dry, this area required a bit more sanding to soften up... but it did... and feels just like the rest of the chair fabric.
Step #3: If you plan to decoupage, now is the time!
I love this paper.... and would love for you to try one of her amazing designs. I have a personal link for her products and if you will use my link I do receive a small commission. So thank you!
Check out all the Mint by Michelle decoupage paper designs HERE. I've also listed the paper link in my shop section of this post.
I use Satin Top Coat to apply my papers. Brush top coat onto fabric. Lay paper onto wet top coat. Smooth it into place with your hand or a wad of kitchen plastic wrap to smooth out wrinkles and press out air bubbles.
This paper is tough...you can lift and reposition if you need to. Once in place, reapply top coat over the paper. Once dry you can use an exacto knife to trim away the excess paper from your chair back.

Because I created this chair live in my private group, Curiously Creative, I don't have many process photos. However... I do have a blog dedicated to teaching the art of applying decoupage to fabric. Check it out HERE!
Step #4: Time to paint your wood frame
I painted directly onto the wood with no primer since I was using black paint.

I wasn't concerned with paint adhesion or wood tannins.... so this alleviated the priming step for me.

For this chair, I used two coats of paint for full coverage.
Step #5: Finish for lasting protection
I applied a satin top coat onto the wood frame for added protection to the paint finish.
I used a very light brushed on coat of Easy Peasy Spray Wax to all fabric areas. This adds a scotch guard type of protection to your painted fabric.
These painted fabric chairs are more than just a featured art piece, they are fully functional chairs!

PRO TIP: I prefer for the chair to be given 2-3 days to cure before use. The paint will be fully cured in 30 days.
PRO TIP: Do not use harsh cleaners on this finish. A simple damp cloth or baby wipe is perfect to remove any dirt or spills.
The Finished Look: Carnival Queen Painted Fabric Chair
I think this chair is just stunning!
I've made her available for purchase on my website. You can find her HERE.

More Inspiration: Painted Fabric Chairs
I absolutely love painting fabric chairs! I've pulled together a few past projects that came to mind when working on this piece! I hope you can use them to draw inspiration as you paint a fabric chair. Here are the additional designs for your inspiration:
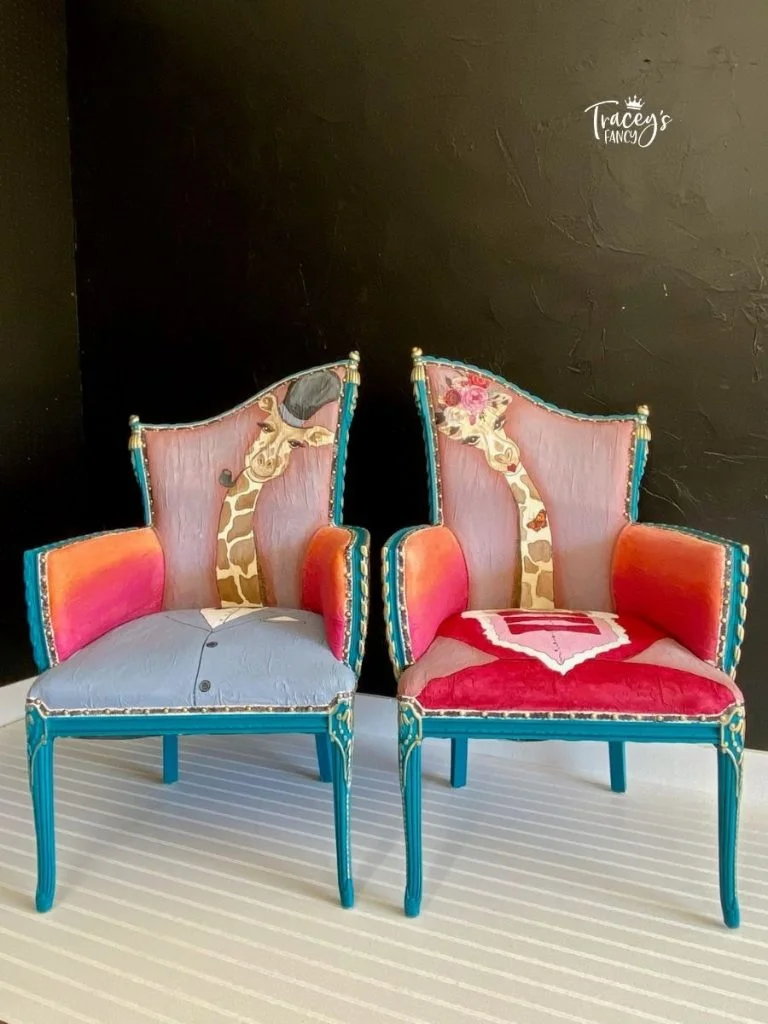
Giraffe Chair - once upon a time there were two giraffes that fell in love...
Tattoo Decoupage Chair - love it or hate it. This one went viral on IG!
Whimsical Mermaid Chair - detailed fabric chair painting techniques in this one!
Cat Chair - Decoupage mixed with paint. Learn how to "paint-in" the design paper.
Painted Zebra Chair - funky and overflowing with personality
Nutcracker Chair - what are your thoughts on holiday-themed furniture??
Click on any photo below for more up-close photos and all the design details


Don't forget to visit my blog about How to Decoupage on Fabric!
And of course, be sure to visit my Whimsical Home Decor Ideas for more fun whimsical ways to decorate your space!
JOIN ME FOR MORE...with Curiously Creative
If you enjoyed this and want more of a deep dive into home decor and DIY processes, I would love it if you joined my exclusive online creative group, Curiously Creative. I show up LIVE to guide you through every step of updating, upcycling, crafting, and creating on-trend home decor and gift-giving ideas!

Want more fancy furniture & design?

Save & Share on Pinterest!
Please please please share my Carnival Queen Painted Fabric Chair project and follow me on Pinterest!


Comments