

Whimsy Meets Sophistication: An Alice in Wonderland Dresser Makeover
- Jan 11
- 6 min read
What happens when Alice in Wonderland collides with the Dallas Cowboys?
On the surface....absolutely nothing! But when this client asked me to design a dresser for her master bedroom that honored both, I knew this was going to be one of those projects where creativity had to stretch in new directions.
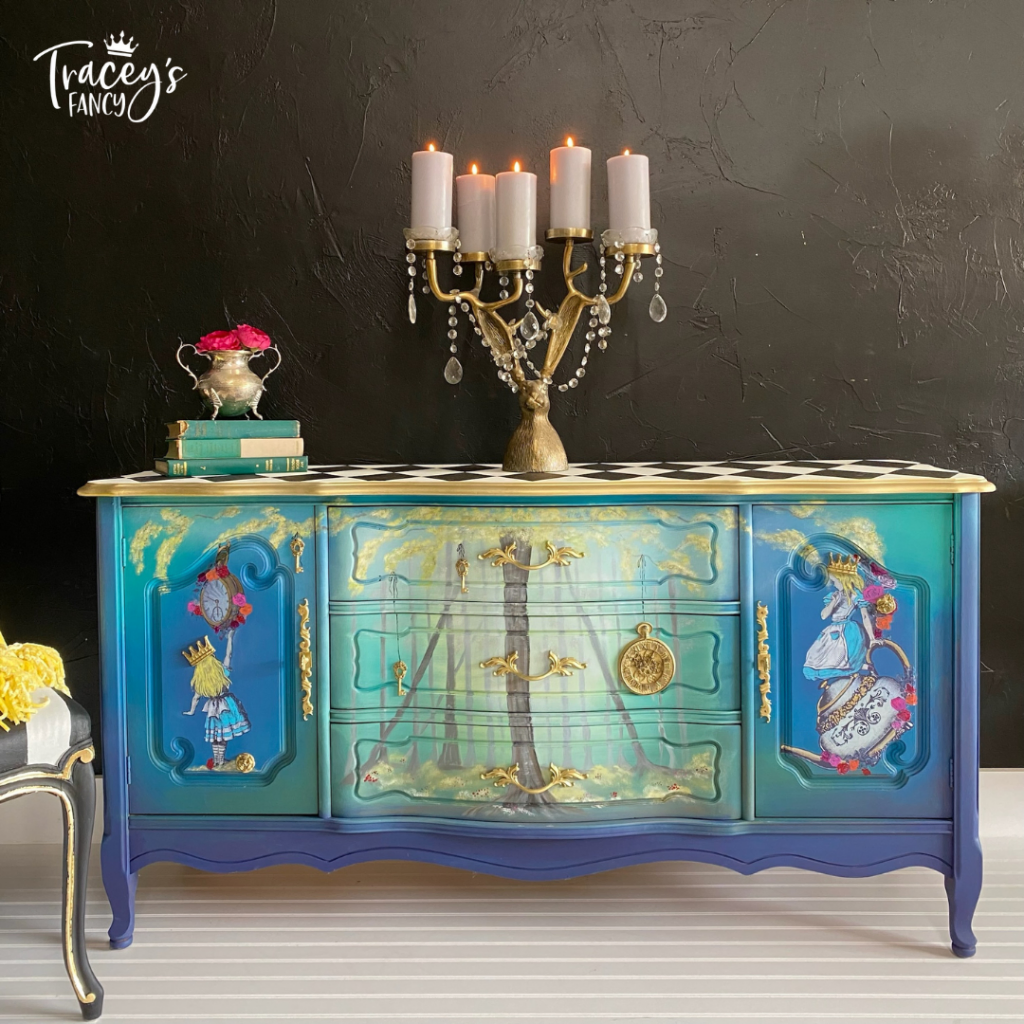
With blue and a touch of silver as the foundation, the challenge became finding the balance between playful whimsy and playful adult design. This dresser was created to complement the ethereal blue king bed you may have seen in a previous post and it may just be one of my favorite creative puzzles to date.

If you are a new reader, hello and welcome to the Fancy Fam! With over a decade of furniture painting experience, I can honestly say that sharing my projects through this blog is still my favorite way to inspire! I've got years worth of fun and creative ways to update your home decor and furniture through paint! If this sounds like something you'd like to have delivered to you every Sunday be sure to sign up for my weekly newsletter here!
The Starting Point
The dresser was a factory finish black with a well-loved (aka: damaged) top surface.

Because of the damage to the top surface I knew I'd mostly likely feature a harlequin finish which hides imperfections beautifully as well as plays into the Alice theme.
Additional MUST READ blogs for any furniture painting projects

Supplies Used: Alice-in-Wonderland Dresser Makeover
Boss Whhttps://dixiebellepaint.com/collections/bonding-boss/products/bonding-boss-slick-stick-but-better/?rfsn=9169396.e528d4ite
Quilter's Diamond Template (for harlequin design)
You can also shop my favorite products and tools in my Amazon influencer list here.

This post may contain affiliate links. I could make a commission at no charge to you if you purchase my recommended products. Please read my disclosure here and my privacy policy here.
Prep Work & Priming
I started with a thorough cleaning and deglossing with White Lightning, then removed all hardware.
I also scuff sanded the top surface as well as smoothed out some of the damaged areas before priming with a single coat of Bonding Boss in White.


Once dry, the top surface was painted with two coats of Dixie Belle Fluff.

I then painted the entire body of the dresser in a single coat of Antebellum Blue.

Choosing and Applying the Decoupage Papers
I knew I wanted Alice-themed decoupage on the sides and a few of the door/drawer fronts. After much searching, I found the perfect paper from a company in the UK — and they were worth the wait!
I could not wait to use this Alice looking through the keyhole decoupage papers!

I purchased them in several sizes (for other projects) but used two of the smaller ones for the front to doors.
As with all decoupage, I painted a coat of white (Gardenia) and allowing it to dry prior to applying the paper. Having white behind your paper keeps your paper colors nice and bright.


I then painted both sides of the dresser white prior to applying the large decoupage sheets with clocks, cups and cakes! I am in love!


For the top three smaller drawers on the front of the dresser I chose to use the teacup paper which I think is just perfect!

Decoupage PRO Tips:
Lightly spritz the back of your decoupage paper with water and let to rest about 1 minute prior to applying.
Use DB Satin Top Coat as your decoupage medium......to both apply and top coat your paper! It works like magic!
Use a ball of saran wrap to smooth out your papers and to help release any air bubbles.
Additional MUST READ blogs for detailed decoupage application instructions:

Painting Details and Striping
For the striped drawer fronts, I mixed Antebellum Blue and Savannah Mist to achieve a soft tone-on-tone stripe that didn't overpower the design.


The Harlequin Top
This finish is always a labor of love — and no two are ever exactly the same.

It is almost impossible to explain my harlequin technique on the top surface as it seems to need tweaking with each project. But for this one, I used my quilters diamond template and worked my way across from the center out. I trace the template as a move along with a washable pencil.
Once completely drawn I trace over the pencil with a Sharpie marker and then wipe away any remaining pencil lines with a wet paper towel. This allows me to paint in the diamonds and not have smeared pencil as I go.
I used Caviar as my black....and my favorite music to help pass the time. I ALWAYS love this finish!! It is worth every minute that it takes to complete it!


Aging the Entire Piece with a Paint Wash
This final step completely transformed the dresser.
I created a paint wash using In the Navy to knock the finish back from bright and youthful.....to aged and ethereal!
I simply watered down the navy paint and covered every inch of the body of the dresser - including the decoupaged papers.


I worked in sections, keeping the paint wet, until I could wipe back any paint wash I didn't want....exposing the Antebellum Blue (or decoupage papers) from underneath.

It is a fabulously fun technique and the difference that it makes....the transformation that occurs before your eyes.....is just an experience I want you to have!
I realize it is scary to slop dark blue runny paint all over your perfectly painted piece but as long as you work in small sections.....keeping your spray bottle close by....and using appropriate brushes to keep the paint feathered as you go.....it's worth the try!
To finish this piece off, I top-coated with two coats of Clear Coat Satin.
Hardware Transformation: Adding a Pop of Silver
The hardware was transformed from a dark bronze to an antiqued silver...to bring in the silver that I promised!


I used DB Gilding Wax which is a personal favorite of mine!
Alice in Wonderland Dresser Makeover: The Finished Design
This piece is a true blend of imagination, craftsmanship, and trust. It’s such an honor when clients allow me to bring their vision to life—and just as special to share the entire process with you here.

Unexpected combinations really can create something beautiful… and this dresser proves it.

**Clearly these final staged photos are AI generated and thank goodness for that option because no one wants to see the mess that is in my shop right now! lol
More Inspiration: Alice in Wonderland
I'm no stranger to Alice in Wonderland inspired furniture pieces. I LOVE to imagine them and then bring them to life! Here are additional designs for your personal inspiration:
Alice in Wonderland Tea Set - There's always time for tea!
Wonderland Fabric Chairs - the chair backs just might be more inspiring then the front...
Wonderland Inspired Buffet - full-on Alice in Wonderland design!
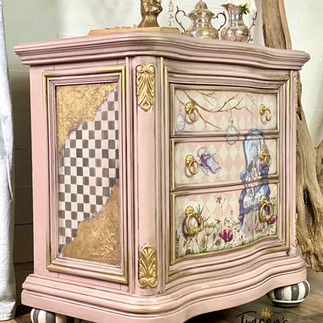
Alice in Wonderland Nightstand - soft pink whimsy
Wonderland Demi-Lune Side Table - a fun whimsical piece
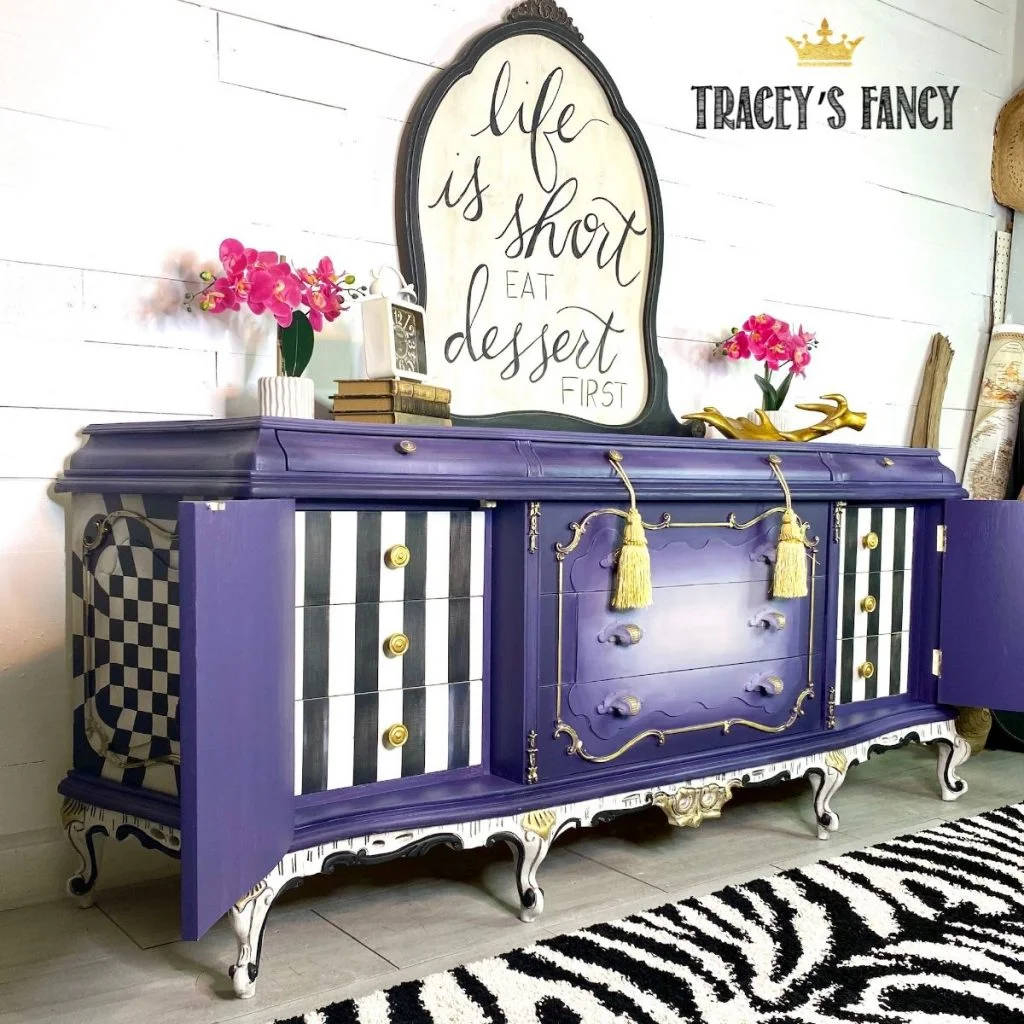
Whimsical Color Blended Dresser - a bold nod to Alice in Wonderland with a stunning purple design
Click on any photo below for more up-close photos and all the design details


More Inspiration: Decoupage Furniture
I have blogged about decoupaging a variety of pieces and surfaces over the years! Here are more of my unique styles for your inspiration:
Hand Painted Cat Chair - the original "paint in" technique on fabric
Lilly Pad Dresser - another decoupage paper piece with incredible blending
Kidney Shaped Floral Vanity - decoupage on a curved surface
Highland Cow Writing Desk - whimsy elegance with hand-painted edges
Mediterranean Armoire - bright blue colorful Spanish tiles
Vintage LIFE Trunk - the bright and bold decoupage paper transformed this old trunk
Click on any photo below for more up-close photos and all the design details


Visit my 10 Creative DIY Decoupage Ideas Blog to see even MORE decoupage projects!
JOIN ME FOR MORE...
Curiously Creative
If you enjoyed this and want more of a deep dive into home decor and DIY processes, I would love it if you joined my exclusive online creative group, Curiously Creative. I show up LIVE to guide you through every step of updating, upcycling, crafting, and creating on-trend home decor and gift-giving ideas!

Better Together
Join Matt and me every Wednesday night for LIVE thrift flipping! We offer weekly LIVE videos (Wednesdays at 7 pm cst) on Facebook as we upcycle and dress up items we find from our local thrift shops using paint and other upcycling materials..... as a way to network with others while settling into our new empty nesters lifestyle.

Want more fancy furniture & design?

Save & Share on Pinterest!
Please share my Alice in Wonderland dresser makeover and follow me on Pinterest!


Comments