

Whimsy Elegance Highland Cow Writing Desk: How to Blend Decoupage Paper for a Finished Look
- Aug 31, 2025
- 5 min read
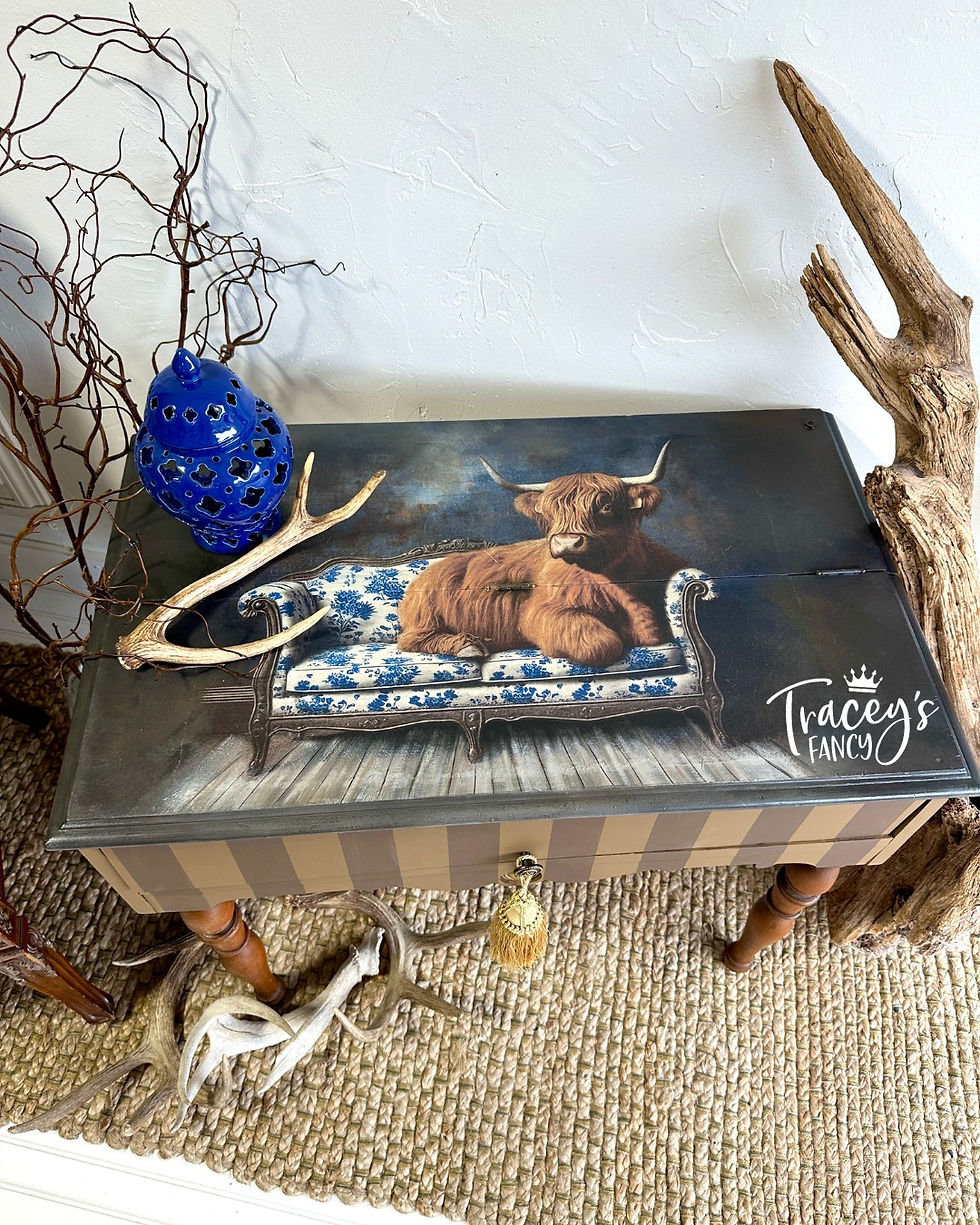
What happens when a Highland cow decides to take a little beak on a fancy french Chinoiserie sofa? You get the perfect mix of whimsy and elegance.....printed on a brand new decoupage paper that instantly stole my heart! And what better stage than an antique writing desk? Let me show you how I blend the decoupage paper with paint for a finished look across the entire piece of furniture.
If you are a new reader, hello and welcome to the Fancy Fam! With over a decade of furniture painting experience, I can honestly say that sharing my projects through this blog is still my favorite way to inspire! I've got years worth of fun and creative ways to update your home decor and furniture through paint! If this sounds like something you'd like to have delivered to you every Sunday be sure to sign up for my weekly newsletter here!
Supplies Used: Blended Decoupage Paper Project
You can also shop my favorite products and tools in my Amazon influencer list here.

This post may contain affiliate links. I could make a commission at no charge to you if you purchase my recommended products. Please read my disclosure here and my privacy policy here.
How to Prep Your Decoupage Paper for Blending
This particular Highland Cow-Ture paper is an A2 size....which means it's not quite large enough for a large piece of furniture....but is most likely too big for small items such as serving trays.

So this little writing desk was truly the perfect fit!

I began trimming away the hard edge of the decoupage paper - which is always a good idea. It helps to have the frayed fibers to blend and smooth out with your paint once you've place it onto your surface. I do this by wetting the perimeter of the paper with water and then just pulling away the hard edge.

If you look closely here you can now see the frayed edge which is much easier to smooth out during the blending process.

I then traced around the perimeter of the paper with chalk to define where I needed to lay down my coat of white paint.
It's also always a good idea to paint a layer of white under ALL colored decoupage paper. It helps to keep your paper colors true. You can see here how I have drawn my space and then filled with my white paint of choice.


I also "pre-cut" my paper....which I don't always do. But this desk surface had hinges in it that were going to get in the way of laying the paper down smoothly. So I chose to precut the paper and lay it down in two pieces....which was super easy!


How to Apply Decoupage Paper
My application process is so easy with Clear Coat Satin! It's my FAVORITE decoupage medium and I can't believe I went so long not knowing about it!

Just brush on the Clear Coat.... gently wet the paper and lay it down... smooth out with a ball of plastic wrap.... and top with a final coat of Clear Coat!


I did this with both pieces of the paper and done!

I have several other tutorial blogs featuring other specific decoupage techniques. Be sure to check them out too!
Painting the Antique Writing Desk
While this was drying, I painted the body of the desk in Pine Cone.

I also took the Pine Cone onto the surface around the paper to cover the white paint that was still showing.


This just helps to even the tone for the upcoming blending process.
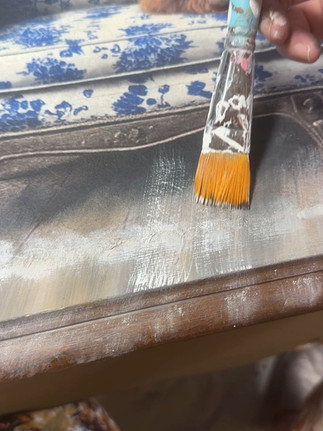
How to Blend In the Decoupage Paper
The blending process is my favorite part!!! I pulled colors from my shelves that were similar to the colors and tones of the paper.


I just open the colors and sit them close to my work space....and begin stippling them on freely. I use the same brush.....and just dip, stipple, blend, repeat!


It is challenging but SO rewarding. And I couldn't be happier with this result!

I actually have a 3-hour Decoupage Furniture Tutorial course where I go into detail teaching this blending technique. You can find it HERE.

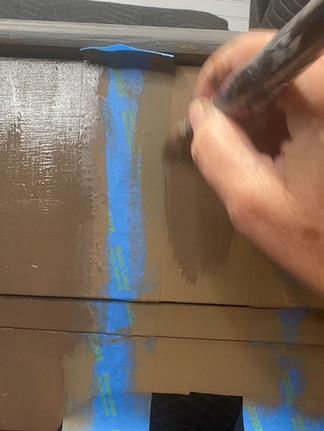
Blending the Decoupage Paper Floor Took Some Effort!
Blending the floor was challenging even for me......I just followed the line and angle of the boards.


I didn't stress about covering up the board lines. I just got the floor colors painted with the direction that looked best and then repainted in my lines and shadows!
It was SO much fun and I love how it turned out!

Visit my 10 Creative DIY Decoupage Ideas blog to see even MORE decoupage projects!
Adding a Touch of Whimsy
Now that the top surface is done I just needed to add my whimsical stripes in Chocolate over the Pine Cone.


Brown on brown stripes is certainly a first for me but I think its a perfect combo for this paper!
I also think Cobalt Blue and White would look great....but this was a gift to my sister and the bold blue just wasn't going to work in her home.

And This is the Final Look!!!
I think she is just fantastic and my sister does too! She now sits in the entry of her home.....just ready to set the tone for all who enter! The blending of the decoupage paper with paint really completed the design across this cute little writing desk!
I've already ordered several of these decoupage papers for future projects....and I hope you are inspired to create with it too!
More Inspiration: Decoupage Furniture
I have blogged about decoupaging a variety of pieces and surfaces over the years! Here are more of my unique styles for your inspiration:
Hand Painted Cat Chair - the original "paint in" technique on fabric
Lilly Pad Dresser - another decoupage paper piece with incredible blending
Kidney Shaped Floral Vanity - decoupage on a curved surface
Mediterranean Armoire - bright blue colorful Spanish tiles
Vintage LIFE Trunk - the bright and bold decoupage paper transformed this old trunk
Click on any photo below for more up-close photos and all the design details


Visit my 10 Creative DIY Decoupage Ideas Blog to see even MORE decoupage projects!

I also have several other tutorial blogs with specific decoupage techniques. Be sure to check them out!
JOIN ME FOR MORE...with Curiously Creative
If you enjoyed this and want more of a deep dive into home decor and DIY processes, I would love it if you joined my exclusive online creative group, Curiously Creative. I show up LIVE to guide you through every step of updating, upcycling, crafting, and creating on-trend home decor and gift-giving ideas!

Want more fancy furniture & design?

Save & Share on Pinterest!
Please please please share my Highland Cow Writing Desk: How to Blend Decoupage Paper Project and follow me on Pinterest!


I'M HOOKED! I'm a beginner. I've only done a couple of projects and I was browsing Pinterest, looking for tips, tricks and inspiration, when I stumbled upon your work. ABSOLUTELY AMAZING! My creative side has been re-awakened. I had no idea how endless the possibilities really are. Ok, gotta go now, I have projects to get to! LOL
Just WOW! Such a beautiful job of blending…you’d never know the paper was only in the center! Looking forward to more like this! And the cow on the sofa is great 😁Love, Love, Love 💕!