

A $40 Snowman Turned Into the DIY Snow-Lady Centerpiece of My Dreams!
- Dec 21, 2025
- 5 min read
Every now and then, a project comes along that transports me right back to my childhood — and this three-foot-tall diy snowman centerpiece is officially at the top of that list.

If you are a new reader, hello and welcome to the Fancy Fam! With over a decade of furniture painting experience, I can honestly say that sharing my projects through this blog is still my favorite way to inspire! I've got years worth of fun and creative ways to update your home decor and furniture through paint! If this sounds like something you'd like to have delivered to you every Sunday be sure to sign up for my weekly newsletter here!
The Before!
She started her life as a simple “snowman butler” that I ordered from TJ Maxx for a little over $40.

You can find similar ones online for $500 (yes… five hundred dollars!), usually holding gold plates for cookies or treats. Mine came with the plates too, but I knew right away I had zero intention of using her as a cookie server.

I wanted her to be a centerpiece — something whimsical, feminine, and full of personality.
And honestly, I just felt like she needed to be a lady. A snow-woman? A snow-lady? Whatever she is… she’s fabulous!
Supplies Used: DIY Snowman Centerpiece
You can also shop my favorite products and tools in my Amazon influencer list here.

This post may contain affiliate links. I could make a commission at no charge to you if you purchase my recommended products. Please read my disclosure here and my privacy policy here.
Priming and Painting: The Snowman Centerpiece Transformation Begins
As always, I started exactly where I start with almost every makeover — primer.
I gave her a solid coat of Dixie Belle BOSS in Gray to help everything adhere perfectly.

Once she was one uniform color, I painted her with a single coat of Fluff Chalk Mineral Paint — my go-to warm white — and suddenly she looked like a blank canvas ready for her dress up session.

Since she was destined for my dining room table (with my favorite custom painted pink chairs!), I reached for my Cotton Candy Custom Pink Mix. This is the same pink I use all throughout my home, so it felt like the perfect feminine touch.
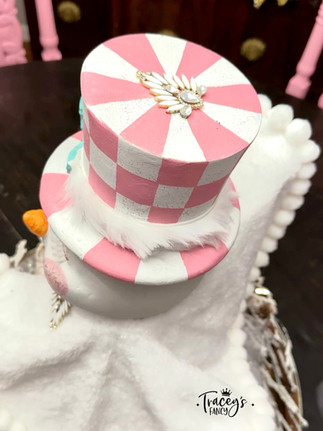
I painted cotton candy pink stripes on her scarf and added pink-and-white checks to what had originally been a plain black top hat.


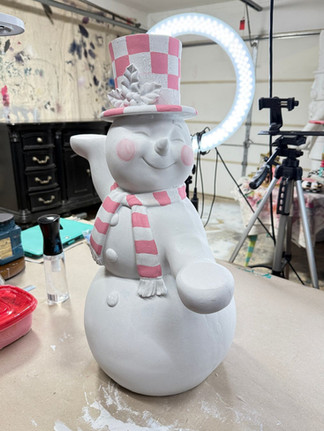

A little pink blush on her cheeks, a bright orange nose, and she instantly had the sweetest personality.


Once all the painting was finished, I sealed everything with a single coat of Satin Top Coat to protect the details.
The Fun Begins: Embellishing Her Outfit
With the painting complete, it was time for my favorite part — embellishing!
I wanted her to feel whimsical and dressed-up, like she was ready for a holiday party. Here’s what I added:
✨ A Pearl Tutu
I found a gorgeous pearl-trimmed fabric at Hobby Lobby and turned it into the sweetest little tutu.

Instantly she became a snow-lady on skates....just like memories of Christmas cartoons from my childhood.
✨ A Cozy Cape
Believe it or not, this is just a mini tree skirt from Hobby Lobby. I added pom-pom trim, flipped it around, and turned it into the cutest cape to drape around her shoulders.

✨ Vintage Jewelry Magic
I created this project inside my Curiously Creative membership, and my members had the most brilliant idea — use my stash of vintage jewelry!
So I added:
• Two vintage brooches as clasp on her cape
• A tiny chain I removed from an old belt
• And another sparkly vintage brooch right on the top of her pink checked hat
These tiny touches added so much charm and character.


✨ Fancy Buttons & Rhinestones
I attached flat-back pearl and rhinestone buttons to her body, and then wrapped her waist with a vintage rhinestone belt I had in my studio. I didn't even have to trim it down....not kidding...it was the perfect size and clearly meant to be!

✨ A Pearl Purse
This might be my favorite little detail — I found a miniature pearl doll purse on Amazon!

The pearls were a bit yellow, so I simply spray-painted the whole thing white. Now she has her very own handbag, and it is ADORABLE.
✨ False Eyelashes!
When I tell you this brought her to life… the white false lashes were the perfect finishing touch.

Her little squinty smiling eyes paired with long snowy lashes? She's beyond precious!

I offer more in-depth online video tutorials with hours of instructions and detailed supply lists. Check out a few below...


The Final Reveal: DIY Snowman Centerpiece
She is sweet, feminine, whimsical, snowy perfection — and she makes me smile every time I walk past my dining room.
I’m keeping her for myself (this one is not for sale!), and I enjoyed every moment of creating her. A $40 find turned into something truly magical… and absolutely priceless!
A Little Creative Encouragement Before You Go
Before I wrap this up, I want to say this clearly: the purpose of sharing this project isn’t to show off my snow lady. It’s to remind you that you are allowed to think outside the box — especially when it comes to your home and your creativity.
Just because something comes from the store looking a certain way doesn’t mean it has to stay that way. Sometimes the item you buy is simply the starting point… the blank canvas… the little spark that leads to something that fits your home, your style, and your joy so much better.
If you love bold colors? Add them.
If you adore rhinestones and ribbons? Go for it.
If you want to take a $40 snowman and turn her into a pink, pearl-wearing snow queen? Well — you absolutely can.
My hope is that this project encourages you to play, to experiment, and to trust your creative eye. Your home should make your heart happy, and sometimes all it takes is a little imagination (and maybe a tutu!) to turn something ordinary into something magical.
More Inspiration:
I have a couple other holiday projects to share! ! I hope you can use them to draw inspiration for your upcoming project.
Christmas Elf Gumball Machine - a fun jolly Christmas gift idea
Whimsical Nutcracker Glow-Up - a cheap store-bought turned masterpiece
Santa Serving Tray - thrifted silver tray gets new life
Santa Globe - checkered globe for a fun holiday home decor
Black & White Decanters - misc bottles painted to be a matching set
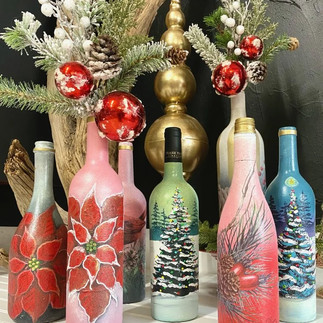
Holiday Painted Wine Bottles - a perfect holiday gift
Click on any photo below for more up-close photos and all the design details


Join Me For More
Curiously Creative
If you enjoyed this and want more of a deep dive into home decor and DIY processes, I would love it if you joined my exclusive online creative group, Curiously Creative. I show up LIVE to guide you through every step of updating, upcycling, crafting, and creating on-trend home decor and gift-giving ideas!

Better Together
Join Matt and me every Wednesday night for LIVE thrift flipping! We offer weekly LIVE videos (Wednesdays at 7 pm cst) on Facebook as we upcycle and dress up items we find from our local thrift shops using paint and other upcycling materials..... as a way to network with others while settling into our new empty nesters lifestyle.

Want more fancy furniture & design?

Save & Share on Pinterest!
Please share my DIY snowman centerpiece project and follow me on Pinterest!


This Snowlady is absolutely adorable! I love it; as a centerpiece? PERFECT.