

From Tired to Timeless: Brown Painted Furniture Makeover with Countryside Toile Details
- Sep 7, 2025
- 5 min read
Stop right there --- yes, you're in the right place, and yes, we are using BROWN paint today on this furniture makeover project!
I know , I know! Brown isn't a color you usually see me reach for, but when I found this antique writing desk for next to nothing with its quaint shape... and classic style... I felt like it was begging for something unexpected.

If you are a new reader, hello and welcome to the Fancy Fam! With over a decade of furniture painting experience, I can honestly say that sharing my projects through this blog is still my favorite way to inspire! I've got years worth of fun and creative ways to update your home decor and furniture through paint! If this sounds like something you'd like to have delivered to you every Sunday be sure to sign up for my weekly newsletter here!
Introducing *NEW* Products
Enter the new Truffle paint color.....and the gorgeous Countryside Toile rice paper!!!


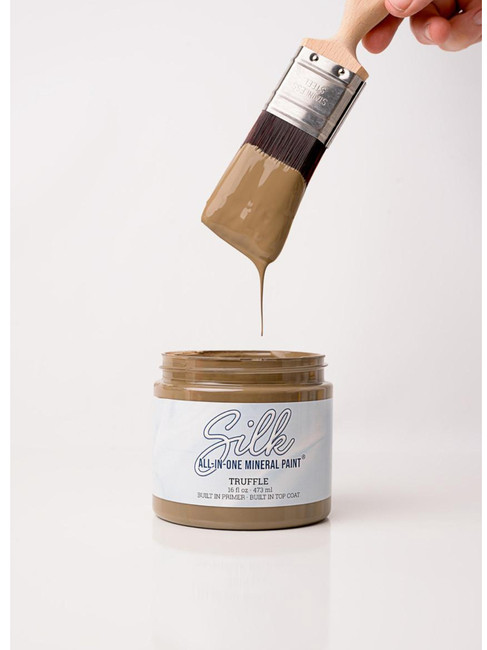
The rich mushroom-brown and the subtle yet classy decoupage paper were made for each other.
And they were the perfect pairing for the insets of this writing desk.

Supplies Used: Brown Painted Furniture Makeover
Bonding Boss Clear
You can also shop my favorite products and tools in my Amazon influencer list here.

This post may contain affiliate links. I could make a commission at no charge to you if you purchase my recommended products. Please read my disclosure here and my privacy policy here.
But First....We Needed Furniture Surgery!
This little desk has experienced a LOT of life! It had endured multiple sub-par repairs.
Now, we are NOT refinishers over here but Matt is a little picky about his repairs. So he made me wait several days of dismantling.....rebuilding.....gluing and clamping.....before he let me get to the pretty part!


I gave it a good clean with White Lightning only to notice massive bleed through.
No problem as I have my favorite primer ever....Bonding Boss. I usually use white or gray but because I "thought" that I wanted to leave some wood grain showing in areas, I went with the clear version of Bonding Boss!
That's the beauty of having options in this particular primer! So, I covered the entire outside of this piece in clear primer!

However I then decided to paint the entire outer body... because sometimes I change my mind!
Painted Furniture Makeover...in Brown!
Now for this Yummy Brown. You may want to screenshot that sentence as I'll likely never say it again! Seriously. I think the last time I did a furniture makeover with brown was this Brown Monochromatic Armoire from a looooong time again.

But this Truffle brown is yummy.....and it covered in ONE coat.

It is a Silk paint... meaning it has a built in primer and top coat... and this entire line of paint always has the most amazing coverage. So yes, ONE coat of Truffle and done!


I then painted the insets of the desk with Chantilly white....also part of the Silk line. This coat does not need to be perfect as it only serves as a light backdrop for the upcoming rice paper.
Adding the "Almost" Perfect Paper to the Inset
The Countryside Toile rice paper is an A2 size. It was ALMOST perfect for these insets but still left a little space to the right and the left....no worries....I have a solution for that.

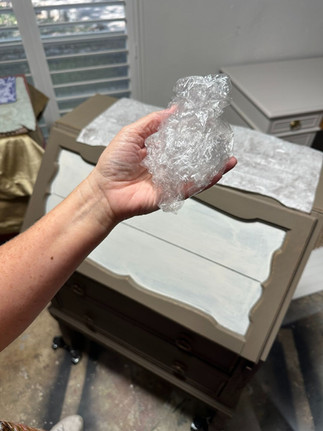
I pressed the design of the insets into the paper.... pre-cut the paper... and applied in my standard decoupage steps.
mist the back of the paper lightly and set aside
apply the creamy Clear Coat Satin to the inset
lay the precut misted paper into place
smooth out with a wadded up piece of plastic saran wrap
top with a final coat of Clear Coat Satin


Now for those small gaps between the right and left of paper to the edge of the inset.
I simply mixed a bit of Truffle with my Dixie Mud (white) in a cup....to make my paint a bit thicker.

I stippled this thicker paint into place around the outer edges of the paper. The thicker paint helps to disguise the raised edges of the paper that didn't quite make it to the inset edge.


Using my French Tip brush, I then just continued to stipple and lend that paint around the edge of the drawer until it softened....


...and looked beautifully shadowed!

Visit my How to Apply Decoupage blog for more detailed instructions!
Final Touches on my Brown Painted Furniture Makeover
The final step was applying my Gold Gilding Wax with a tiny craft brush to the framed areas of the upper inset.


Oh! The handles of the drawers! I did remove them during the painting process. And I lightly dusted these in the Gold Gilding Wax as well. Once dry I just put them back in place on the drawer fronts.

I did VERY lightly distress the corners and edges of this little cutie! I just felt like I needed to bring forward some of its age and history. This is when I was really glad I had decided to prime with CLEAR Bonding Boss. Had I primed with gray or white, I wouldn't have been able to distress back without it showing white or gray underneath! So keep that in mind for those of you that prefer a little distressing.
The Finished Look: Brown Painted Furniture Makeover
There is no need to top coat this piece.....as it's part of the SILK line and has a BUILT IN top coat!
So this means......we are DONE!
What do you think? I think it's the perfect blend of old-world charm and fresh creativity!
More Inspiration: Writing Desk Makeovers
I pulled a few blogs from past projects that came to mind when working on this piece! I hope you can use them to draw inspiration for your upcoming project. Here are the additional designs for your inspiration:
Colorful French Desk - beauty in chaos. A statement on all sides!
Whimsical Painted Writing Desk - looking for a desk with a more whimsical bold design...this is it!
Painted Vintage Desks - One desk. Two stunning looks.
Highland Cow Writing Desk - you just have to see it!
And of course, don't forget to visit my last brown furniture armoire makeover from years and years ago. See how my design style has evolved over the years!
Click on any photo below for more up-close photos and all the design details


JOIN ME FOR MORE...with Curiously Creative
If you enjoyed this and want more of a deep dive into home decor and DIY processes, I would love it if you joined my exclusive online creative group, Curiously Creative. I show up LIVE to guide you through every step of updating, upcycling, crafting, and creating on-trend home decor and gift-giving ideas!

Want more fancy furniture & design?

Save & Share on Pinterest!
Please share my brown painted furniture makeover project and follow me on Pinterest!


Comments