How to Transform Your Old China Hutch With a Gorgeous Water-Washed Turquoise Finish
- Tracey Bellion

- Dec 10, 2023
- 6 min read
Updated: Apr 30, 2025
It's been quite awhile since I had the opportunity to custom paint an early American china hutch. I believe this is the third one of almost the exact same style....and all three belonged to the client's grandmothers!
It is such an incredible honor to be trusted with these family heirloom pieces and I take the task very seriously. Do you have a furniture piece similar to this one in your home? Have you ever considered giving it a facelift with paint like I did with this turquoise china hutch?

If you are a new reader, hello and welcome to the Fancy Fam! With over a decade of furniture painting experience, I can honestly say that sharing my projects through this blog is still my favorite way to inspire! I've got years worth of fun and creative ways to update your home decor and furniture through paint! If this sounds like something you'd like to have delivered to you every Sunday be sure to sign up for my weekly newsletter here!
The Design Plan - Turquoise China Hutch
When it comes to family heirlooms, I make sure to ask very specific questions that will give me a clear picture as to what my client is wanting.
In this case, my client was looking for something colorful and fun.....slightly aged to fit the farmhouse vibe......but not a mix of patterns.
She didn't mind bold color as long as it was a color she was naturally drawn to.....and would feel comfortable having in her home for years to come!
So we settled on turquoise and she allowed me to take it from there!
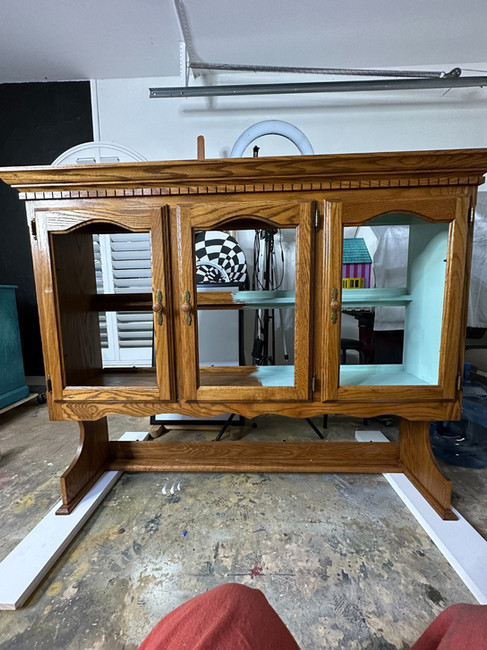
But FIRST...the before!

After removing the hutch from the base of the cabinet, its as if you are working on two pieces....
PRO TIP: It is important to keep these pieces right next to each other when working on them separately to ensure you colors or tones or similar.
I gave it a thorough cleaning with White Lightning....and a bleed through test completed.....I was able to proceed with the painting!
Supplies Used
This post may contain affiliate links. I could make a commission at no charge to you if you purchase my recommended products. Please read my disclosure here and my privacy policy here.
Turquoise China Hutch Paint Technique
Time to start painting! I'll talk you through each step to achieve a similar look.

Adding The Gulf Base Coat
The Gulf is one of my top five favorite colors in the Dixie Belle chalk mineral paint line up. It is a happy blue with hints of green...very similar to the Tiffany Blue color. I chose this as my base coat.
I painted one solid coat of The Gulf followed by a light stippling technique with the round brush to break up the brush strokes.... and allowed it to dry.
Applying Water Wash Finish
The next portion of this finish is all the same......working in small sections at a time.....over and over again.
It requires a "water wash" or "color wash"....which is basically another color of paint (I chose Antebellum Blue) that has been greatly watered down to a water like consistency....and applied over your base coat of paint. You want your new layer of paint to remain wet which is why you want to work in small sections.
SIDE NOTE: The beauty of Dixie Belle paint....is that you do not lose color when you water it down. It is so highly pigmented that it just becomes thinner but the rich pigmented color remains.
Blot and Spritz...and Blot Again
Once the new color has been painted on, you may begin blotting off with your rag.
PRO TIP: I use a microfiber cloth as it really absorbs the excess water and helps to speed the project along.
When you've blotted off the top color, I then spritz with a very quick spray of water one last time.....allow it to sit for about 30 seconds or so. It may even begin to move the paint a bit with the beginning of a run
Then again I use the cloth to blot off the excess water. This last amount of blotting really gives a speckled look to the finish....or even an aged and chippy appearance.
You can see that really well here on the lower corner of this door.

If you are a perfectionist this finish may be a bit of a struggle for you as it never lifts the same. It is a very random and organic finish. I am a recovered perfectionist and I now find this type of uber natural finish to be very empowering!
And Repeat...
Just repeat this same process in sections until you have completed the entire piece.
For another unique paint technique, see my texture grunge Tattered Elegance Bombe chest.
Highlighting the Trim
I wanted to add a third blue to the mix even though there appears to already be multiple blues with this technique. So I added a tiny bit of bold turquoise called Peacock to the curves of the door carvings, the deep crevices next to the trim, hinges and hardware holes.
This is just an extra detail that really doesn't make that much of a difference....I just like the whole more-is-more vibe.

One Additional Shade of Blue
I am so satisfied with the overall look of this finish that I didn't even move forward with my planned dark waxing process. I decided to forego the deep aged look and leave the piece with just multiple shades of blues! To add to the depth of the outer cabinet....I chose yet another lighter shade of blue-green for the inside of the upper. Using Sea Glass....I painted two full coats to the inside of the upper portion.

Finishing with a Dusting of Gold
You may have noticed that I painted some of the hardware in place. I contemplated leaving the hardware in the exact same finish....however I always struggle with this.
So I chose to do a light dusting of gold gilding wax.
There is something so gorgeous about the combination of a shimmery gold dust with colors of the sky. I think the gold is the perfect finishing touch to this once outdated orange oak early American china cabinet.
Waxing for an Authentic Natural Vibe
To keep the authentic natural vibe, I chose to wax this piece...which I rarely do. I usually prefer the sheen of a top coat. However this "rain on a window" seemed to be calling for the nautralness of a wax.

I chose Best Dang Wax in Clear and applied it using the BDW brush in a circular motion. I allowed this to sit for a few hours and then buffed back with a buffing pad to remove any excess wax paste....leaving a velvety smooth finish!
The Finished Look: Turquoise China Hutch
My client is having new glass panels cut for the upper cabinet. The original pieces were very taste specific with stained glass flowers...and they really needed to be replaced. So for now.... this is the finished look... minus the glass... and I must admit I am very pleased! And to be honest... I think Meme would be pleased too!

I cannot wait to see this in their "dream home" that they are currently designing! It will stand proudly in the dining room as a feature piece of furniture......to remind everyone that sees it how much their Meme loved them!
More Inspiration: China Hutches
Do you have an early American china hutch? Looking for more deisgn ideas? Check out this other projects for inspiration:
Shabby White China Cabinet - subtle farmhouse look
Geode Painting Hutch - unexpectedly "geode painting" on furniture
Tone-on-Tone Whimsical China Hutch - turquoise china hutch with a whimsical spin
Metallic Blue China Cabinet - painted...start to finish...in under 2 hours
Click on any photo below for more up-close photos and all the design details
JOIN ME FOR MORE...with Curiously Creative
If you enjoyed this and want more of a deep dive into home decor and DIY processes, I would love it if you joined my exclusive online creative group, Curiously Creative. I show up LIVE to guide you through every step of updating, upcycling, crafting, and creating on-trend home decor and gift-giving ideas!
Want more fancy furniture & design?
Save & Share on Pinterest!
Please please please share my soft giraffe print jewelry armoire makeover project and follow me on Pinterest!


Comments