

How to Paint a Fabric Chair: Mixing Chalk Paint and All-In-One Paint on a Bold Sunburst Chair
- Mar 15
- 6 min read
One of the things I love showing people is that you're not locked into just one type of paint when learning how to paint a fabric chair. On this piece, I used two different paint lines—an all-in-one paint and a chalk mineral paint—to demonstrate how beautifully they can work together.
This particular chair was painted just before my recent Painted Chair Retreat at Home online class. It wasn't actually painted during the class itself, but I used it as an example while we talked through the many possibilities of painting fabric chairs.

If you are a new reader, hello and welcome to the Fancy Fam! With over a decade of furniture painting experience, I can honestly say that sharing my projects through this blog is still my favorite way to inspire! I've got years worth of fun and creative ways to update your home decor and furniture through paint! If this sounds like something you'd like to have delivered to you every Sunday be sure to sign up for my weekly newsletter here!
Supplies Used:

You can also shop my favorite products and tools in my Amazon influencer list here.

This post may contain affiliate links. I could make a commission at no charge to you if you purchase my recommended products. Please read my disclosure here and my privacy policy here.
Why I Always Prime Before Painting Fabric
Over the years, I have written and demonstrated many tutorials explaining why I always use a primer when preparing fabric chairs for paint.
I always choose Bonding Boss (and most often in gray) just as you can see me using here.

Priming fabric helps to:
Block stains in the fabric
Eliminate unwanted odors
Lock down loose fibers
Create a smoother surface for paint
I use both the gray and white versions of Bonding Boss, but I most often use the gray one.
Remember to use this right out of the jar with little to no added water. Apply it in a thin single layer. Allow this to dry overnight. You must then sand the cushions to smooth and soften the surface before adding paint.


This prep step makes a huge difference in the final finish.
Knowing and using the correct painting supplies makes all the difference...
FIVE Most Important Supporting Products (Bonding Boss is one of them)
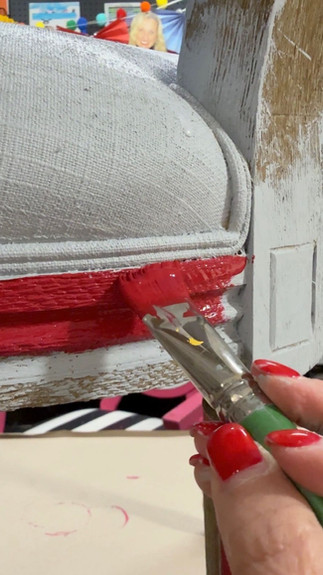
Painting the Chair Frame with All-In-One Paint
For the wood frame of the chair, I chose Fiery Sky, a bold and unapologetic red from the Silk paint line.

Silk paint is considered an all-in-one paint, which means it contains a single coat of primer, the paint color itself, and a single coat of sealer.....with one application.
Sounds fabulous, right?
So why don’t I use this paint line all the time?
Mostly because the color selection is smaller and it’s not quite as easy to blend shades together, which is something I tend to do often. However, it is a fabulous line of paint for simpler, single-color applications.
This Fiery Sky just calls my name and begs to be used! What you see here is ONE coat of Fiery Sky! That is amazing isn't it?


Painting the Fabric Cushion
For the chair cushion, I switched paint lines and chose Florida Orange from Dixie Belle’s chalk mineral paint collection. The Silk line does not currently have an orange shade, so this was the perfect solution.

Just like the SILK paint used for the red frame, this paint also covered in ONE coat! The heavy pigmentation of their paints is very impressive!
Once the paint was completely dry, I sanded back all the orange-painted areas of the fabric. Don’t forget to brush away the sanding dust before moving to the next step.
Creating the Sunburst Design
Next, I drew out my seat pattern—a sunburst design—and began painting every other section with another Silk paint called Prickly Pear.
This vibrant lipstick pink immediately caught my eye.

Again, this was a single coat application.

A last-minute decision to paint the small seat buttons pink ended up being one of my favorite details!

Once the pink paint was dry, I gave the cushion one final sanding to soften the surface and blend everything together.

Adding a Surprise Detail to the Back
To finish the chair, I added large roses to the back using one of my favorite furniture transfers called Roses Are Red.

These roses have such a beautiful velvety and realistic look. I’ve loved every project where I’ve used them, and they add the perfect unexpected pop to the back of this chair.

Want to learn how to apply decoupage on fabric chairs? Visit my How to Decoupage on Fabric blog for step-by-step detailed instruction!
Sealing the Painted Fabric
The final step when learning how to paint a fabric chair is sealing the finish properly.

I sealed the fabric and the roses transfer with a single coat of Easy Peasy Spray Wax. The pink paint has a self sealer in it, but the orange paint needs added protection and the transfer must be sealed or it will peel away over time.
A Colorful Chair with Personality
She’s colorful, a little sassy, and definitely not shy.
But this chair was really just the warm-up!
Next week on the blog I’ll be sharing the two chairs I painted during my online retreat, along with some of the incredible chairs created by the women in the class.
Let’s just say... the creativity in that group was off the charts!
If you love seeing how wildly different a painted chair can become, you’re going to enjoy what’s coming next.
Stay tuned!
Additional MUST READ blogs for any furniture painting projects

FAQ: How to Paint a Fabric Chair
Do you really need to prime fabric before painting? Yes. Primer helps lock down fibers, block stains, and create a smoother painting surface.
Can you use chalk paint on fabric? Yes. Chalk mineral paint works very well on fabric when applied in thin coats and sanded afterward to soften the finish.
Does painted fabric feel stiff? It can initially, but sanding between layers helps soften the finish significantly.
How do you seal painted fabric? A spray wax or soft furniture wax works well to protect painted fabric while keeping the surface flexible.
More Inspiration:
Painting fabric chairs is a skill that I have perfected over the years. And I love it!! I've pulled together a few past chair projects that I enjoyed creating! I hope you can use them to draw inspiration as you paint your own fabric chair. Here are the additional designs for your inspiration:
Giraffe Chair - once upon a time there were two giraffes that fell in love...
Tattoo Decoupage Chair - love it or hate it. This one went viral on IG!
Whimsical Mermaid Chair - detailed fabric chair painting techniques in this one!
Cat Chair - Decoupage mixed with paint. Learn how to "paint-in" the design paper.
Painted Zebra Chair - funky and overflowing with personality
Carnival Queen Decoupage Chair - Neutral front. Bold in the back.
Click on any photo below for more up-close photos and all the design details


JOIN ME FOR MORE...
Curiously Creative
If you enjoyed this and want more of a deep dive into home decor and DIY processes, I would love it if you joined my exclusive online creative group, Curiously Creative. I show up LIVE to guide you through every step of updating, upcycling, crafting, and creating on-trend home decor and gift-giving ideas!

Better Together
Join Matt and me every Wednesday night for LIVE thrift flipping! We offer weekly LIVE videos (Wednesdays at 7 pm cst) on Facebook as we upcycle and dress up items we find from our local thrift shops using paint and other upcycling materials..... as a way to network with others while settling into our new empty nesters lifestyle.

Want more fancy furniture & design?

Save & Share on Pinterest!
Please share my bold sunburst fabric chair makeover project and follow me on Pinterest!


Comments