

Faux Rust Paint Finish: a console table makeover
- Jun 11, 2023
- 5 min read
I'm not even sure where to begin to explain how this table ended up with this finish but I'm not mad about it! I am in LOVE with the final faux rust paint finish!
I realize it is VERY outside my norm of whimsical and pink and that the polar opposite of that is rusty and masculine....but I happen to love this too!

If you are a new reader, hello and welcome to the Fancy Fam! With over a decade of furniture painting experience, I can honestly say that sharing my projects through this blog is still my favorite way to inspire! I've got years worth of fun and creative ways to update your home decor and furniture through paint! If this sounds like something you'd like to have delivered to you every Sunday be sure to sign up for my weekly newsletter here!
Before the faux rust paint finish
This began with a very nice console table from a high end furniture store here in San Antonio. It is heavy, curvy, carved....very Texas Hill Country vibe....and once upon a time I would have done anything to acquire it.
However today it just feels dated and bulky.

My Initial Design Plan - "Beachy" Vibe
Initially, I wanted to give it a colorful beachy vibe in layer upon layer of teals and blues.
I added the first coat of paint and texture using Cobalt Blue and Sea Spray texture additive.
I teach a variety of ways to apply Sea Spray texture in this blog HERE.
This went on beautifully and was received REALLY well online!

That was a total accident as the cobalt blue was intended to be an under-layer only!
This caught me off guard and I wound up pushing the project aside for weeks!
Rethinking the Design Plan - Stone/Cement?
I returned to the table thinking it needed to go the stone/cement direction!

So, I covered the blue with multiple shades of gray.....and again it fell flat and got pushed aside for several more weeks.

I certainly hope this is making you feel better about your own struggles with what direction to take with your painted furniture pieces.
New Direction...Faux Rust Paint Finish!
Then the treasure box happened....you can see all the details here. I loved this result so much that I decided this is exactly what I wanted to do with the console table!

In a sense, I was taking it back to the original idea of giving it the "beachy" vibe. LOL! Just without the bold color...instead going for more of a sunken treasure!
Supplies Used

This post may contain affiliate links. I could make a commission at no charge to you if you purchase my recommended products. Please read my disclosure here and my privacy policy here.
Creating the Faux Rust Paint Finish
Apply a base coat
At this point we aren't lacking in layers!
The more the better so I began laying down the colors in the same sequence as the treasure box. A full coat of Coffee Bean followed by a dry brushed coat of Rusty Nail....allowing plenty of Espresso to show through.

I even used a dry paper towel to rub off any excess Rusty Nail immediately after applying it.


Thoughtfully applying the iron & copper patina paint
I then dry brushed Dixie Belle's Iron ALL OVER the table surface. I applied it in all directions but kept it very thin and sparse!


I added heavier layers of Copper to the corners and near the carvings.

Once dry, I repeated this process.
Creating the Faux Rust with reactive spray
I worked quickly and in sections (legs first/top table surface/bottom table surface) because you need to apply the reactive sprays while the paint is wet.
I sprayed with the Green Spray first. Then spritzed with the Yellow Spray. Then followed with the Green Spray again. Sort of pushing the Yellow Spray in the direction I wanted more of the orange rust in the end!


This process is so much fun! I just kept working my way around the table.

Paint...spray...spray...spray...and move to the next section.
And now we wait...
Once fully covered, I just walked away!
Now it's time to wait and let the magic happen.

PRO TIP: I find it most fun to do this at night. Then close up shop and leave for the night....only to return the next morning for the surprise!
More Inspiration: Patina Paint Finish
The exciting part about using Patina is that the look is unique and unpredictable every time! Here are other patina designs for your inspiration. I hope you are curious to give it a try...
Treasure Box - rust patina finish that was the inspiration for this piece
Rust & Roses Dresser - a feminine dresser with patina for a little edge
Terracotta Pot Makeover - take your outdoor space to the next level with these Patina terracotta pots
Gator Patina Dresser - the gorgeous greens and blue and of course gator!
Leopard Patina Grudge Dresser - zebra, leopard, patina all in one piece! See how several pattern and textures can be used in one cohesive look
Patina Round Up - all the patina pieces in one blog with details of what to expect with each reaction
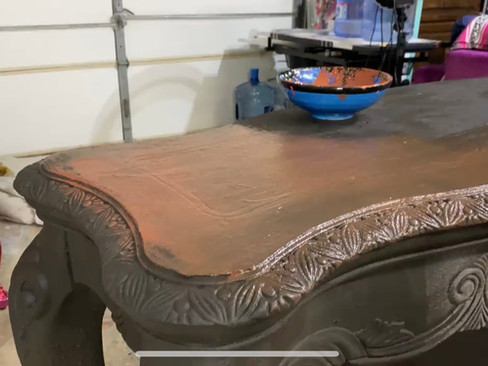
The Finished Look
And holy moly was I surprised on this one!
Would you just look at the top surface?!?! It must have 12 colors of patina working there!

Isn't it hard to believe that we really only used two colors of paint....two metallic patina colors and then the sprays?

It reminds me of the canyons in New Mexico when the sun is setting.....the clay just casting all the browns and oranges and yellows!

It is so authentic....so real......and still blows my mind that this much rust can be achieved in such a short amount of time.

And thank goodness for that first original coat of blue paint with its Sea Spray....because just look at that leg!!! Do you see all the texture that we got? Do you see all the Yellow Patina that settle into the run off?

I couldn't be happier with it!
I never imagined this is where it was going but as I said....I'm not mad about it!
Here's to hoping this lands in someones beach house, lake house, or even a man cave!
It looks old...and bold...and stands proudly as if it truly has a history to tell!
More Inspiration: Painted Jewelry Armoires
As I mentioned before, painting with Patina is all kind of fun! Check out some of my other patina projects and I hope you will be inspired to try a Patina project yourself in the near future!
Treasure Box - rust patina finish that was the inspiration for this piece
Rust & Roses Dresser - a feminine dresser with patina for a little edge
Terracotta Pot Makeover - take your outdoor space to the next level with these Patina terracotta pots
Gator Patina Dresser - the gorgeous greens and blue and of course gator!
Leopard Patina Grudge Dresser - zebra, leopard, patina all in one piece! See how several pattern and textures can be used in one cohesive look
Patina Round Up - ALL the patina pieces in ONE BLOG with details of what to expect with each reaction
JOIN ME FOR MORE...with Curiously Creative
If you enjoyed this and want more of a deep dive into home decor and DIY processes, I would love it if you joined my exclusive online creative group, Curiously Creative. I show up LIVE to guide you through every step of updating, upcycling, crafting, and creating on-trend home decor and gift-giving ideas!

Want more fancy furniture & design?

Save & Share on Pinterest!
Please please please share my faux rust paint finish console table project and follow me on Pinterest!


Comments